The lack of sun at the moment has really put the brakes on my token dietary supplementation efforts.
In despair I have put a number of plants out of their misery including:
3 x Eggplants 6 x Snow Pea Vines 1 x Row of Spring Onions 1 x Row of Rocket 1 x Row of Swiss Ruby Chard 2 x Containers of Bok Choy 2 x Zucchini plants 1 x Chilli plant
Now I am down to just my herbs, a couple of cucumber vines on the way out, a zucchini plant that isn't showing much promise and a couple of tomato seedlings. It's a very sad looking balcony at the moment but on the plus side it gives us a bit more room to hang out Boudi's cloth nappies....
On Wednesday morning 25th the wife had a bit of a show on one of her pads and told me that she thought Boudi (ボーディ) would be coming soon. At about 9:30pm that night she woke me up to tell me that she thought her waters had broken and by 10:00pm she started feeling some contractions. Because her waters had broken we had to go straight into the hospital for a check-up to make sure everything was OK and we were there from about 11:00pm until about 10:00am on Thursday morning 26th with my Mum arriving at the hospital around 6:00am as the second support person for the wife.
As the wife wasn’t contracting regularly and there were no other complications we were able to go back home and were told to return to the hospital at 6:30am on Friday the 27th for her to be induced if she didn’t start contracting more regularly in the meantime. My mum stayed with us that night and we all managed to get a few hours sleep (even though the wife was contracting she was still able to get a little sleep!). We were up early and the wife was feeling good but still not contracting regularly so we decided to go to the hospital a bit early at 5am to help the wife settle into her birthing room before the serious business began.
Once the midwife hooked her up to the inducement drip and a bunch of uncomfortable monitors and she started to up the dose, the wife started to contract a lot more strongly and regularly and Mum and I worked hard to support her as best we could. For a while the wife was standing up and squatting during every contraction but we managed to talk her out of continuing that in order to save her legs! The midwife found that Boudi wasn’t in the ideal position and got the wife to lie on her side during which time the wife asked to try some gas to suck on during her contractions which by this stage were getting quite strong. The wife was quite vocal during her time on the gas but Mum was worried that she would break her teeth on the mouthpiece so the wife agreed to stop using it. She said that it didn’t do much to help her pain anyway!
The midwife came back in to check on how the wife was going and was happy with her stage of dilation and Boudi’s position and so the wife was able to get on her back instead of her side. The midwife stayed to give the wife a quick lesson in pain management through breathing which she mastered in about two contractions and from that point on through all of the contractions to come and all of the pushing until Boudi was out, she barely made a noise and required no other medication for pain!!! The wife even managed to have a bit of a nervous laugh during a break between contractions when Boudi’s head was all but through. Once Boudi’s head was out, I helped turn and lift him on to the wife's chest and we all had a tear in our eyes listening to him screaming. We were surprised that he was so clean, he had really long soft fingernails and so much hair! It was 2:37pm on Friday the 27 of November.
After Boudi had a suckle, the wife was taken away to surgery to have an epidural and to get her 3rd Degree Tear cleaned and stitched up. Ma went home and I was left with Boudi in the birthing room for about 20 minutes until we were both moved into a woman’s ward room to wait for the wife to get back from surgery. I set up her and Boudi’s clothes and other stuff in the room until one of the midwives came to check Boudi’s temperature and found that he was a little bit cold. To help bring his temperature back up he was placed skin-to-skin onto my chest which was a great father-son bonding experience for us. We were both a little unsettled for a while as he was scratching my chest with his long fingernails and trying to latch onto one of my nipples! He soon got tired of that and gave up and we stayed like that until mum returned from surgery.
Everything went well with the wife’s surgery and I stayed with them in the ward until about 9pm. Over the next few days I spent from 8am to 8pm with them (except for between 12:00pm and 2:00pm during which time there are NO VISITORS allowed) until we were finally cleared to go home at 4:00pm on Monday the 30th December 2009.
We’ve been back in Australia for almost two years now but there isn’t a day that goes by where I don’t think of how great it would be to head back to Japan. We do have plans to move back in the future but as we are eagerly awaiting the birth of our first child it won’t be for a little while yet.
I first became interested in vegetable gardening as a young child of about 10 (I believe) after a regular holiday trip to our house by my Scottish Grandmother. She immigrated to a farm plot in Bathurst, Australia from Scotland as a young Post-WWII wife and mother and knew the benefits and need to be semi-self sufficient in regards to the feeding of oneself.
Of course as a 10 year old boy I was mostly interested in getting muddy and playing with a few worms, but together we managed to set up a small veggie plot in which we planted corn, radishes, beans, beetroot, carrots, strawberries and a few herbs. I kept up the maintenance of my little garden after Nana had returned home but was always too impatient and picking things early. The veggie patch soon gave way to make room for a wooden half-pipe ramp and my newly found skateboard obsession though......
I never thought much about gardening from that point on although strangely I always maintained an interest in watching ‘Landline’ for some reason, which is a weekly Australian agriculture and farming programme and I later went on to University to study aquaculture. Stranger still, I developed quite a good pair of Blue Thumbs working in the aquaculture industry specialising in the growing of phytoplankton for use as live feed in hatcheries for the farming of prawns/shrimps for a number of years before heading up to Japan.
Japan is a country of contrasts on so many levels, not the least of which is the difference between the city and the country. I lived in NagoyaCity (the third largest city in Japan) but one of my many jobs involved my taking a 40 minute train trip out of the city. Within 10 minutes on the train out of the city the concrete jungle gave way to rice fields and areas where just about every square metre of land that could be utilised to grow something edible was farmed.
My wife’s family owns a large orchard in Nagano where they commercially grow apples and pears and also watermelons, peaches and numerous vegetables for their own consumption. We would often take trips to Nagano during the various harvest times and help pick a few boxes of fruit.
Here we are in the family orchard in Nagano picking apples in Autumn and pears in Summer.
As a family we would also go on daytrips to surrounding farms during the year to partake in the eating of various fruits and vegetables. Here we are with our Nephew and Niece in Shizuoka gorging ourselves on strawberries.
Over time I started to feel a bit guilty returning to my city apartment and back to the life of a voracious consumer in Japan. On our return to Australia I was determined to get back into vegetable gardening even though I knew we would be continuing a life as apartment dwellers.
I think I’ve done alright so far with my little plot here on our balcony in Australia but I can’t stop daydreaming about a house in the country in Japan, getting down and dirty in a ‘real’ veggie garden and trading in my Blue Thumbs for a nice Dark Green pair!
What: Yates Improved Apollo Seeds Where: 3 x yogurt containers. When: 22 November.
Sown in: Mixed Potting Soil Fertiliser: Blood and bone.
Advertised Germination: 10-12 Days. Actual Germination: 8-10 Days.
Advertised Maturity: 12-14 Weeks. Actual Maturity: 28 weeks.
I thought I had saved a bunch of seeds from the previous Reggae Roma Tomato plant but despite searching high and low I couldn't find them at home and couldn't find any seedlings at the local nursery where I got the original plant, so I have decided to branch out and try another variety. "High Yielding" it says, but can it beat the 60 tomatoes I got from my first Reggae Roma?
2 December 2009
10 December 2009
I've moved the best two plants into two self-watering containers.
27 December 2009
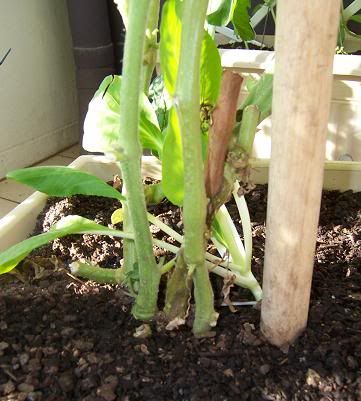
Both of these plants suffered badly from a lack of sun combined with excess water, however I chopped them off and side shoots just might salvage them yet.
17 January 2010
This plant took off from side shoots several times only to die off again.
February 2010
I persisted however and ended up with some very messy main stems (that's a random Bok Choy plant on the right).
March 2010
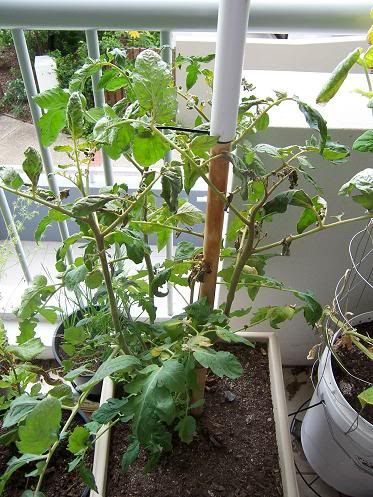
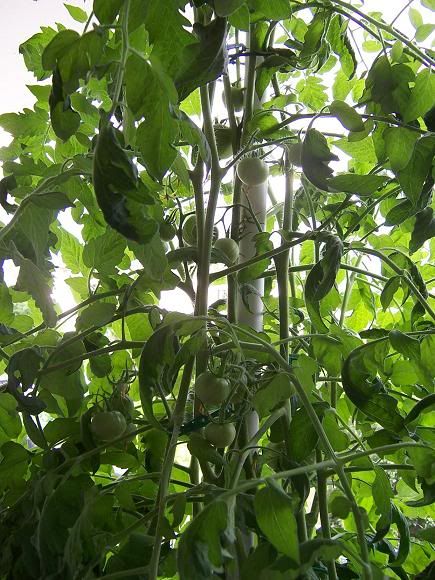
I'm glad I stuck with this plant as although it it quite messy it has taken off in a big way in the last month and is starting to produce fruit.
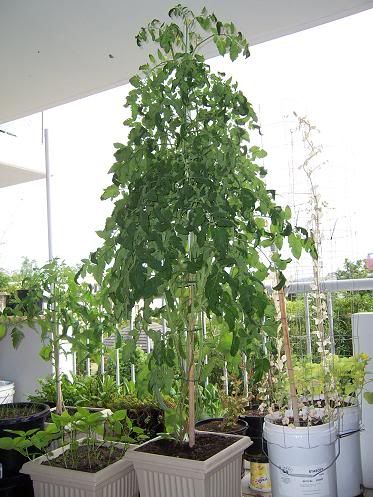
10 April 2010
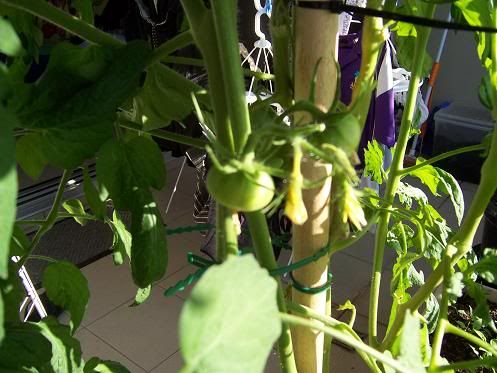
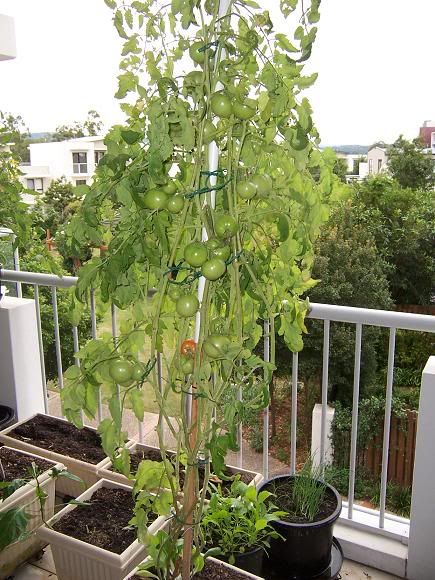
This one is now over 7ft tall and at last count had 50 tomatoes on the way.
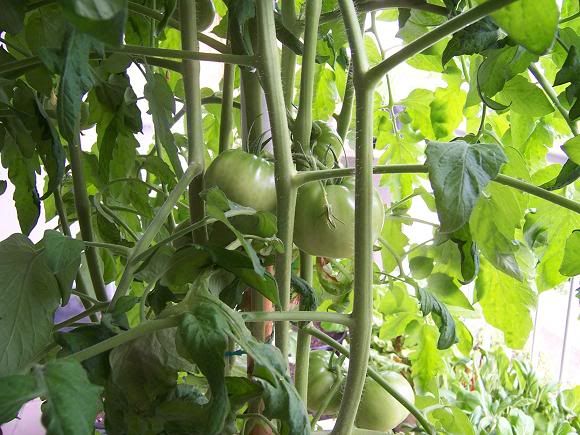
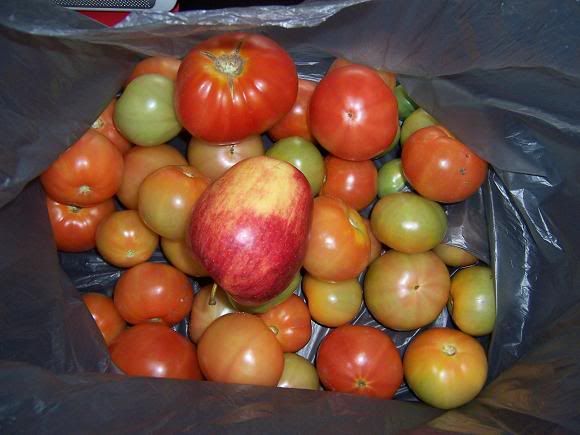
29 April 2010
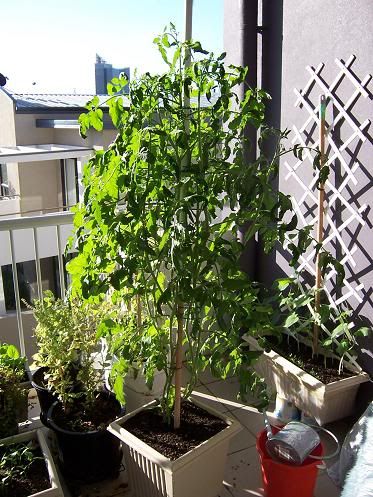
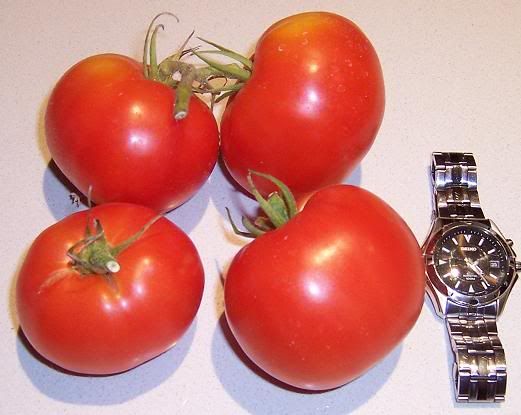
I returned home from 10 days holiday to find this plant suffering heavily from being over-watered. I tried to salvage it but in the end I picked off all of the Tomatoes as the plant was on it's last legs so to speak. Even after all of the dramas this plant has been through I still managed to harvest just under 4kg of Tomatoes from it! I put all of the green tomatoes into a plastic bag with a ripe red apple and they all started to colour up nicely.
Yes you read that correctly and it is official, Summer is going to be my Winter and this is despite summer here on the Gold Coast having an average temperature of 24.1 C - 75.4 F!
We moved into this apartment last year in March and we had plenty of sun back then, but now I have quickly seen my small plot go from getting around 6 hours of fierce sunlight per day to getting about 3 hours of weak sunlight just before it gives way to the moon.
I can only assume that the slight seasonal change in the daily wondering of the sun has been just enough for it to catch the edge of our building and making it MIA for the better part of the day…..
Unless I can convince the building manager from the adjacent apartment to erect a massive solar reflector for me there’s not much I can do except consolidate what I’ve got for the next three months and start making plans for the return of the sun in Autumn.
I use a lot of recycled materials in my small garden including 1.5L soft-drink bottles, 1L yogurt containers, 3L ice-cream containers and 20L buckets for raising seedlings and for growing out various crops. The following steps outline how to construct a very effective self-watering container from a 20L bucket and a product I have recently discovered.
Step 1: Of course is to collect and thoroughly clean a bucket, in this case I have a couple of 20L buckets sourced from a bakery.
Step 2: Drainage holes need to be cut into the bottom of the bucket for instances when the self-watering reservoir overflows. I didn't have a drill so I just used a sharp knife to twist drill a couple of holes into one sufficiently large hole.
Step 3: The holes need to be covered sufficiently to allow water to flow out but to keep your soil in. A thin layer of coarse gravel would be ideal but I've opted to recycle a couple of 'body scrub sponges' that I've uncoiled.
Step 4: I recently discovered this product at my local nursery which for $4.80 saves me a lot of time setting up my own dodgy self-watering insert! Basically it's just a bowl with a flat perferoted lid that can collect water at the bottom of your container, which can be utilised by roots when required.
Step 5: I place a thin layer of soil in the bottom of the bucket to accommodate and stabilise the plant water well and then because I'm growing plants that need supporting I've inserted an old broom handle and stabilised it with some wire also sourced from the bakery.
Step 6: Then as I do with all of my containers I add a few layers of soil with blood and bone, Water-Storage Crystals and a Rechargeable Solid Water bag as outlined here: http://veggie-might-sp8.blogspot.com/2009/08/water-management.html
The Finished Product
Knock together a trellis from some cheap fencing and you double the range of vegies you can grow in them.
What: Seed (D. T. Brown). Where: 20L Bucket modified to a self-watering container When: 12 October 2009.
Sown in: Yates Premium Seed Raising Potting Mix. Fertiliser: Thin layer of RICHGROW: Organic Blood and Bone + Trace Elements & Sulphate of Potash 100mm below surface.
Advertised Germination: 6 - 10 Days. Actual Germination: 6 Days.
Advertised Maturity: 8 Weeks. Actual Maturity:
19 October 2009
It's starting to get very crowded in here! Lots of flower buds on the way though.
7 November 2009
20 November 2009
It's quite easy to see the difference between the male and female flowers even at this early stage:
These plants were in a position that had very limited sunshine and as such started to get mouldy leaves and what not. I pruned off all of the mouldy leaves and raised it up to get some sun but so far there's been nothing but a steady stream of male flowers developing. There looks to be a few female flowers forming but they shrivel and die long before they even look like blooming.....
10 December 2009
I lost two of the plants, one is on the way out but the last has had a growth spurt! Despite its growth I've got nothing to show for my efforts. There have been a bunch of female flowers but they shrivel and die before getting anywhere near blooming...
27 December 2009
THE ZUCHINNI BLUES.......
I planted 4 zuke seeds about 10 weeks ago and so far have zip to show for my efforts >_< I haven’t had any trouble growing lots and lots of these:
But for no apparent reason they quickly turn into these:
What: Seed (D. T. Brown). Where: 20L Bucket modified to a self-watering container When: 12 October 2009.
Sown in: Yates Premium Seed Raising Potting Mix. Fertiliser: Thin layer of RICHGROW: Organic Blood and Bone + Trace Elements & Sulphate of Potash 100mm below surface.
Advertised Germination: 6 - 10 Days. Actual Germination: 6 days.
Advertised Maturity: 8 Weeks. Actual Maturity: 7 Weeks.
19 October 2009
It's time to knock together some sort of trellis for these plants I think.
7 November 2009
Trellis is up and just in time! It looks like I'll have to extend it if these plants keep growing so fast. Lots of flowers and a few cucumbers on the way if I've hand pollinated them correctly that is.
20 November 2009
It didn't take very long for that cuke to go from the above shot to this!:
1 December 2009
Despite a desperate lack of sun there are plenty more like this on the way, they are yummy too!
7 December 2009
These plants don't get much sun but they are producing well and look quite healthy!
10 December 2009
The lack of sun hasn't done these plants any good and they have lost a lot of leaves, however what remains is still producing ok for the time being.
27 December 2009
These plants started to suffer badly from powdery mildew so I cut off all of the foliage and after 2 weeks and a dose of liquid fertiliser side shoots have taken off and are producing more and larger cucumbers than ever.
I used to grow vegetables in containers in an area of about 2 x 4m on a 3rd floor balcony on the Gold Coast in Queensland, Australia.
I moved to Nagoya, Japan in January 2011 to start my own children's English school and now that it is successfully up and running, I’m finally able to start devoting some time to getting my hands dirty again in a small 2 x 2m plot.